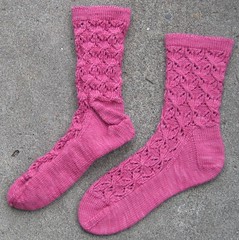
This is part two of a monthly series in which I try to share bits of knowledge I've learned over the last few years as a new designer. Not always about socks, but it is so named anyway.
Part one discussed the submission process. Today I'll talk about something that is critical to the process, but not so glamorous.
Blocking!
Why:

One looks pretty. One looks like dog business. The difference? Blocking. If you are submitting as a designer, you absolutely cannot skip this step, even for swatches. If you are knitting for fun, I hope you'll consider blocking your knits too. At least for the show and tell photo.
You probably know this, but blocking means shaping a wet finished knitted piece to achieve certain results, like altering the measurements, evening out stitches, and opening up lace.
Something I learned the hard way is that lace looks terrible until it is blocked. Not just mine, but everyone's. Always.
There are many methods of blocking, I'll mention a few of them here.
How:
1. Wet blocking. This is almost always the method I use. It's simple and effective. Fill up the sink with water and some gentle wool wash. Squeeze the air bubbles out of your knitted item very gently and let it soak for a few minutes. Drain the sink and gently squeeze the water out of your knitting. Do not rinse. Lay it out on a towel and roll it up, drawing the water out of your knitted object. Finally, lay it out on a dry towel and pin it in place. Or use a blocking tool, as described below.
2. Steam blocking. I've done it, but not often. I find it fussy because it involves an iron or steamer, two items rarely making an appearance in my home. This is a good method for fibers that are delicate or stretch out a lot. Also, it's for you if you are the kind of person who has an iron handy. Congratulations, by the way.
Lay a wet towel on top of your knitting and press it here and there, releasing steam into your object. You can also skip the wet towel and hit the steam button (or use a steamer) over your knitting. When done, pin and let air dry.
3. Spray blocking. I've used this technique with delicate yarns or when the finished piece looks pretty good without any blocking at all. It's quick and easy. Pin the piece in place and spray until damp. Leave it alone until it's dry.
Tools:
1. Rust-proof pins. Avoiding rusty stains on your knitting just makes sense.
2. Blocking wires. These are great for large lace projects. You thread thin wires through the edges of your knitting, instead of 10,000 pins.
3. Sock blockers. I use these constantly. I bought them here. You can also make your own. I wash finished socks and put them on the blockers and basically forget about them for a couple of days. Easy.
In Conclusion:
Yes, blocking makes a huge difference in your finished object. It also says something about you as a knitter. That you care enough about your work to make it the best it can be. You've already invested time and money into the project, why stop short on the final step?
If you are reading this, then you've actually made it to end of a lecture on blocking. Well done! You get extra points for sticking it out. You will undoubtedly have the last laugh when you show off your next properly blocked finished object. Ha!
No comments:
Post a Comment